Companion Plants
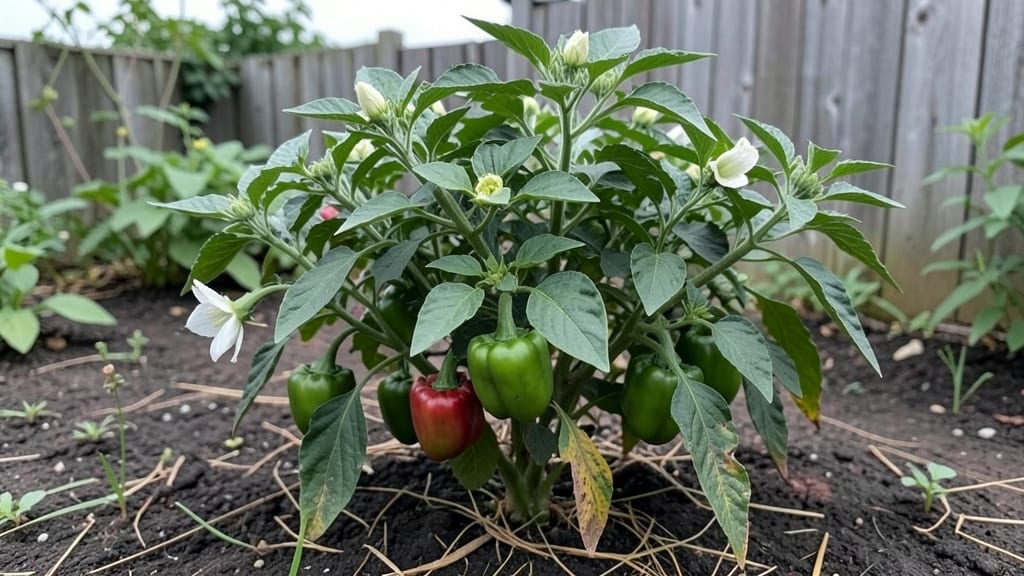
My pepper plants are the backbone of my summer garden—healthy and productive when I get the basics right. 🌿 The secret isn’t fancy tricks but matching their needs: warm soil, steady water, and the right neighbors to keep pests away.
I’ve learned that peppers thrive when they’re not competing for nutrients or battling aphids alone.
Start with well-draining soil mixed with compost, and place them where they’ll get 6-8 hours of sun daily. Water at the base (not the leaves) to prevent diseases, and mulch to keep roots cool.
I’ve found that pairing peppers with basil or marigolds cuts down on pests naturally—no chemicals needed.
By mid-summer, you’ll see glossy green leaves and the first peppers forming. Prune leggy stems early to encourage bushier growth, and pinch off flowers if you want bigger fruits later. The payoff? A harvest that lasts from summer through fall.
Works for containers or garden beds, and even indoor growers can adapt with grow lights. Here’s how to keep them strong from seed to table—no guesswork, just results.
📚 In This Guide
- What you need
- Instructions
- Tips and common mistakes
- Wrapping up and next steps
What you need
- ● Pepper Seeds or Seedlings: Choose disease-resistant varieties (e.g., Jalapeño, Bell, or Cayenne). Start with 4-6 plants for a small garden or 10+ plants for larger harvests.
- ● Well-Draining Soil: A mix of 60% potting soil, 30% compost, and 10% perlite or vermiculite (1-2 cubic feet per plant). Peppers thrive in pH 6.0-6.8 soil.
- ● Containers or Garden Bed: For containers: 5-gallon pots or larger (1 pot per plant). Ensure pots have drainage holes.
- ● For in-ground planting: A sunny spot with 6+ hours of light and 12-18 inches of soil depth.
- ● Fertilizer: A balanced 10-10-10 or 5-10-10 NPK fertilizer (1 tbsp per plant every 4-6 weeks) or organic options like composted manure or worm castings.
- ● Watering Can or Hose: With a gentle spray nozzle to avoid damaging leaves.
- ● Mulch: Straw or shredded leaves (2-3 inches thick) to retain moisture and suppress weeds.
- ● Gardening Gloves (to protect hands from thorns and soil).
- ● Trowel or Hand Shovel (for transplanting or loosening soil).
- ● Pruning Shears (to trim dead leaves or encourage bushier growth).
- ○ pH Test Kit (optional but helpful to monitor soil acidity).
- ○ Companion Plant Supplies: Optional but recommended for pest control—basil, marigolds, or onions (plant 1-2 per pepper plant).
- ● Warmth: Peppers need temperatures above 60°F (15°C). Start indoors 8-10 weeks before the last frost or wait until soil is warm.
- ● Sunlight: Commit to a south-facing or west-facing location (or use grow lights for indoor setups).
- ● Patience: Peppers take 60-90 days to mature—plan accordingly!
Step-by-step instructions for growing healthy pepper plants
Here’s how I grow peppers that stay strong, productive, and virtually pest-free all season long.
🌱 Step 1: Start Seeds Indoors at the Right Time
Peppers need warmth to germinate, so I start seeds indoors 8-10 weeks before the last frost date. Use the 1 packet of pepper seeds and fill small seedling pots with 2 gallons of seed-starting mix—moisten it until damp but not soggy. Plant seeds ¼ inch deep and cover lightly with more mix.
Place pots in a warm spot (75-85°F) like on top of a refrigerator or under a heat mat. Keep the soil consistently moist (not wet) by misting lightly every 1-2 days. You’ll see sprouts in 7-14 days—once they appear, move pots to a sunny window or under grow lights for 14-16 hours daily.
Here’s the thing—peppers hate cold soil. If your home runs cooler, use a seedling heat mat to keep roots warm. Without it, germination slows or fails completely.
☀️ Step 2: Harden Off and Transplant After Warmth Arrives
Two weeks before the last frost, start hardening off seedlings by placing them outside in a sheltered spot for 1-2 hours the first day. Gradually increase time over 10-14 days until they’re out all day. This toughens stems and leaves so they don’t shock when moved to the garden.
Choose a sunny spot with 6-8 hours of direct sunlight and well-draining soil. Dig 4 holes (one for each plant) 12 inches apart—peppers need space to grow. Mix 1 cup of compost into each hole to boost nutrients. Gently remove seedlings from pots, loosen roots if tangled, and place them in holes at the same depth they were growing indoors.
Water deeply right after planting to settle soil around roots. Avoid wetting leaves—peppers are prone to fungal diseases, and damp foliage invites trouble.
💧 Step 3: Water Deeply and Consistently
Peppers hate soggy soil but also dry spells. Water deeply once a week (or more in extreme heat) until top 2 inches of soil feel moist. The key is steady moisture—let the top inch dry between waterings to prevent root rot, but never let plants wilt.
I use drip irrigation or water at the base in the morning to reduce evaporation and fungal risks. Avoid overhead watering—wet leaves attract pests like aphids and spread diseases. You’ll know you’re doing it right when soil feels damp 2-3 inches down after watering.
Real talk: Overwatering kills peppers faster than underwatering. If leaves yellow or stems soften, you’re watering too much.
✂️ Step 4: Prune and Support for Maximum Health
Pinch off the first few flowers that appear on young plants (first 6-8 weeks). This might seem counterintuitive, but it lets the plant focus on growing stronger stems and leaves first. Once established, let flowers develop—peppers need energy to produce fruit.
Use 1 bamboo stake per plant (or a small cage) to support growth as peppers can get top-heavy. Tie stems loosely with soft plant ties every 4-6 inches up the stem. Prune any yellow or diseased leaves immediately with sterilized pruning shears—this stops problems from spreading.
I also remove suckers (small shoots growing in the leaf axils) to direct energy to fruit production. Watch for first true leaves turning yellow—that’s your cue to check for pests or nutrient issues.
🪴 Step 5: Fertilize and Protect Through the Season
Feed plants every 4-6 weeks with 1 cup of 10-10-10 fertilizer (diluted to half strength) to keep them thriving. Peppers are heavy feeders, but too much nitrogen makes them leafy with few peppers. Balance is everything—look for dark green leaves and strong stems as signs you’re doing it right.
To deter pests, sprinkle 1 tablespoon of diatomaceous earth around the base of each plant. It’s non-toxic but keeps bugs like aphids and spider mites away. If you spot pests, blast them off with a strong spray of water—peppers are tough and bounce back.
Here’s the moment that matters: When peppers start coloring up, reduce water slightly to concentrate flavors. Harvest when firm and fully colored—this encourages more production.
Tips & tricks for growing thriving pepper plants
These simple strategies will help you avoid common pitfalls and keep your peppers healthy from seed to harvest.
Germination Secrets: The 75-85°F temperature range is non-negotiable for pepper seeds—any cooler and germination slows dramatically. I place my seedling pots on top of my refrigerator (which stays around 80°F) for consistent warmth. If your home runs cooler, invest in a seedling heat mat—it's the difference between 70% and 95% germination rates.
Lighting Strategy: Those 14-16 hours of daily light are crucial for strong seedlings. If your sunny window isn't cutting it, supplement with grow lights positioned just 2-3 inches above the plants. I use LED grow lights on a timer to ensure consistent light exposure—pepper seedlings won't tolerate dim conditions.
Transplanting Wisdom: When hardening off seedlings, start with just 1-2 hours of outdoor time on the first day. Gradually increase exposure by 1 hour each day to prevent shock. I always transplant on a cloudy day to reduce stress on the delicate seedlings—this gives them the best chance to establish roots without wilting.
Pest Prevention: The 1 tablespoon of diatomaceous earth around each plant creates a natural barrier against crawling insects. Reapply after rain or watering to maintain effectiveness. For fungal diseases, I've found that watering at the base in the morning (when leaves have time to dry) completely eliminates the damp foliage conditions that invite trouble.
Pro Tips for Healthy Pepper Plants
- These simple strategies will help you avoid common pitfalls and keep your peppers healthy from seed to harvest.
- Germination Secrets: The 75-85°F temperature range is non-negotiable for pepper seeds—any cooler and germination slows dramatically.
- Lighting Strategy: Those 14-16 hours of daily light are crucial for strong seedlings.
Frequently asked questions
Got questions about keeping your pepper plants thriving? Here are some of the most common concerns—and their solutions—to help you grow a bountiful, pest-free harvest!
How often should I water my pepper plants to keep them healthy?
Water pepper plants deeply but infrequently—about 1 to 1.5 inches per week, especially during dry spells. Overwatering can cause root rot, while underwatering stresses plants. Morning watering is best to reduce fungal risks. Check soil moisture by sticking your finger 1-2 inches deep; if it’s dry, it’s time to water!
When is the best time to transplant pepper seedlings outdoors?
Wait until after the last frost and when nighttime temps stay above 55°F (13°C). Pepper plants are frost-sensitive! Harden off seedlings by gradually exposing them to outdoor conditions for 7–10 days before transplanting. Mid-to-late spring is ideal in most climates—just ensure soil is warm (at least 60°F/15°C).
What are the best companion plants to keep pests away from my peppers?
Plant basil, marigolds, oregano, or nasturtiums nearby to repel pests like aphids and spider mites. Basil also improves pepper flavor! Avoid planting fennel or beans—they can stunt pepper growth. Interplanting with onions or garlic deters many common garden pests naturally.
Why are my pepper leaves turning yellow? What’s wrong?
Yellow leaves often signal overwatering, nutrient deficiency (like nitrogen), or fungal issues. Check soil moisture first—peppers hate soggy roots! If leaves curl or drop, it could be early blight (a fungal disease). Remove affected leaves, space plants for airflow, and apply neem oil or copper fungicide preventively.
Can I grow peppers in containers? What’s the best setup?
Yes! Use 5-gallon pots or larger with drainage holes and well-draining soil. Place containers in full sun (6+ hours/day) and fertilize regularly (every 2–3 weeks). Dwarf varieties like ‘Jalapeño M’ or ‘Shishito’ thrive in containers. Just ensure pots are stable—peppers can get heavy with fruit!
Wrapping up and next steps
Growing healthy pepper plants is all about the right companions, a little TLC, and a pest-free strategy! With the right mix of herbs like basil and marigolds—and a few smart tricks up your sleeve—your garden can thrive while keeping bugs at bay. 🌱
Now that you’re armed with knowledge, it’s time to get your hands dirty! Start by selecting a sunny spot, planting your peppers with their ideal companions, and monitoring for pests. Before you know it, you’ll be harvesting vibrant, delicious peppers—naturally and effortlessly. Happy gardening! 🌿