Pruning
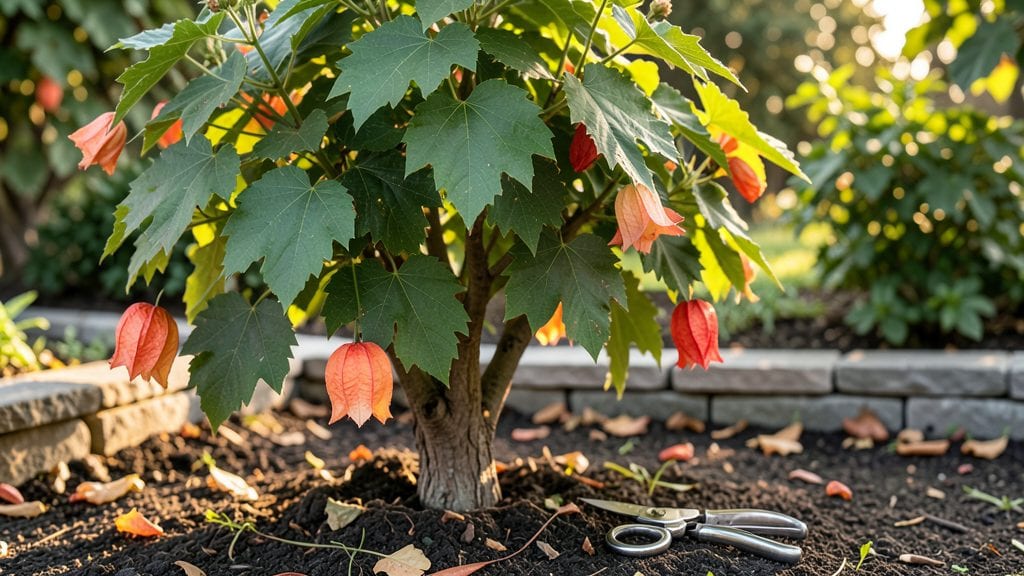
Pruning abutilon plants transforms those scraggly stems into a bushy, bloom-covered powerhouse. ✨ I’ve turned my once-lanky abutilons into vibrant, flowering shrubs by cutting back at the right time—spring or right after blooming—and focusing on the right stems.
The key isn’t just hacking away; it’s encouraging new growth where you want it.
You’ll need sharp pruning shears, a clean cutting surface, and about 30 minutes for a medium-sized plant. Start by removing dead or crossing branches first—they’re the easy wins. Then, cut back leggy stems by one-third to encourage branching, always making cuts just above a leaf node.
This isn’t brutal; it’s strategic, and the results are worth every snip.
After pruning, your abutilon will reward you with denser foliage and more blooms than ever before. The new growth emerges in 4-6 weeks, and by summer, you’ll have a bushier plant with flowers cascading from every branch.
Just keep an eye out for over-pruning—never cut more than a third of the plant at once, or you’ll shock it into dormancy.
This works for both container-grown abutilons and those in the ground, and it’s the secret to keeping them thriving for years. Once you’ve mastered the technique, you’ll never let your abutilons get away from you again.
📚 In This Guide
- What you need
- Instructions
- Tips and common mistakes
- Wrapping up and next steps
What you need
- ● Pruning shears: Bypass pruners (sharp, clean, and sterilized with rubbing alcohol or bleach). Spec: 5–7-inch blades for precision cuts.
- ● Hand pruners: For smaller stems or hard-to-reach spots. Spec: Ergonomic grip, stainless steel.
- ○ Gloves: Heavy-duty gardening gloves (optional but highly recommended—those thorns pack a punch!).
- ● Disinfectant: 1-part bleach to 9-parts water (or 70% isopropyl alcohol) to sterilize tools between cuts.
- ● Rubbing alcohol wipes: For quick tool cleanups mid-pruning.
- ● Sharpie or marker: Permanent marker to label cuttings if propagating.
- ● Plastic bags or containers: With holes punched in the lid (for storing cuttings if rooting).
- ○ Rooting hormone (optional): Gel or powder to boost cutting success (e.g., Clonex or Dyna-Gro).
- ○ Horticultural oil (optional): For sealing larger wounds on the main plant (e.g., Tanglefoot Tree Wound Pruning Sealant).
- ● Timing: Prune in early spring (just before new growth) or after blooming (late summer/fall). Avoid pruning during frost or extreme heat.
- ● Weather: Choose a cloudy day or prune in the morning to reduce stress on the plant.
- ● Water: Water the plant 24 hours before pruning for easier cutting and less shock.
- ● Workspace: Lay down a tarp or newspaper to catch debris (and those pesky thorns!).
- ● Plan: Sketch a rough outline of your desired shape before you start—think "bushy," not "bald"!
How to prune abutilon plants for full, flowering growth
Leggy abutilons beg for a hard prune—here’s how to coax them back into lush, blooming bushes.
✂️ Step 1: Assess Growth and Plan Your Cuts
Examine your abutilon for woody stems and bare patches—these signal overgrowth. I like to prune in late winter or early spring, just as new growth begins. Look for leaf nodes (the small bumps where leaves attach)—these are your pruning guides. Cutting just above a node encourages new branches to form there.
If your plant is severely leggy, don’t panic. Abutilons respond well to aggressive pruning. Mark the areas where you’ll make cuts with a pencil or your finger first—this prevents accidental over-trimming. Aim to reduce the plant’s height by one-third to one-half for the best bushy regrowth.
✂️ Step 2: Sterilize Tools and Make Clean Cuts
Before you begin, wipe your pruning shears with rubbing alcohol to kill any bacteria or fungi lurking on the blades. Dirty tools spread disease, and abutilons are sensitive to infections like powdery mildew. I use sharp bypass pruners for larger stems and clean scissors for smaller branches—never tear or rip the growth.
Make cuts at a 45-degree angle, about ¼ inch above a leaf node. This angle helps water run off the cut and prevents rot. Avoid leaving stubs—always cut flush to the node. If you’re unsure where the node is, err on the side of leaving a little extra stem rather than cutting too close.
✂️ Step 3: Shape the Plant for Balanced Growth
Step back and visualize your abutilon’s new shape. Abutilons thrive with an open, airy structure, so avoid overcrowding the center. Pinch back any overly long or weak stems to encourage branching. I like to create a slightly rounded silhouette—this allows sunlight to reach all parts of the plant, which is key for blooming.
If your plant has one dominant stem, cut it back by half to force side branches. You’ll see new shoots emerging from the nodes within 2-4 weeks. Avoid cutting into old, woody growth—focus on the newer, more flexible stems for the best results.
💧 Step 4: Post-Pruning Care for Recovery
After pruning, give your abutilon a thorough drink to help it recover. Water deeply until it drains from the bottom of the pot, then let the top inch of soil dry out before watering again. This prevents stress from overwatering while keeping the roots hydrated during regrowth.
Move your plant to a spot with bright, indirect light for the first week post-prune. Direct sunlight can scorch new growth, and the plant needs energy to focus on healing. You’ll notice fresh, vibrant leaves emerging from the nodes within 3-6 weeks—this is your signal that the pruning worked.
⏰ Step 5: Fertilize for Strong New Growth
Feed your abutilon with a balanced, water-soluble fertilizer (like a 10-10-10 mix) diluted to half strength. Apply it 2-3 weeks after pruning to support the new growth. I avoid heavy fertilizing right after pruning—it can burn the plant’s tender new shoots. Instead, let the roots recover first.
Monitor your abutilon closely for signs of stress, like yellowing leaves or wilting. If this happens, reduce fertilizer and increase water slightly. With proper care, your pruned abutilon will burst into fresh foliage and—best of all—more blooms than ever before.
Tips & tricks for pruning abutilon plants
Here's what I've learned after reviving multiple overgrown abutilons—these tricks make all the difference between a sad, leggy plant and a bushy, blooming beauty.
Timing is Everything: Late winter or early spring is ideal because your abutilon is just waking up from dormancy. This timing aligns perfectly with its natural growth cycle, giving new shoots every advantage. If you prune too early, you might cut back growth that was already starting. If you wait too late, you risk encouraging more leggy growth before the next season. I've found that pruning right as you see the first hints of new growth—usually in late February or early March—gives the best results.
Precision Cuts Prevent Disaster: In Step 2, when making those 45-degree angle cuts about ¼ inch above leaf nodes, I can't stress enough how important it is to use sharp, sterilized tools. Dull shears crush stems instead of making clean cuts, which invites disease. I've ruined plants before by using dirty tools—always sterilize with rubbing alcohol before starting. Also, resist the urge to make cuts too close to the node; leaving a tiny bit of stem helps prevent rot while still encouraging new growth from that exact spot.
Visualizing the Final Shape: Before you make a single cut, step back and visualize your abutilon's new silhouette. Abutilons naturally grow in a slightly rounded shape, which allows sunlight to reach all parts of the plant. I like to imagine cutting back any stems that would create a "wall" effect in the center—this open structure prevents overcrowding and encourages more blooms. If you're unsure, snap a photo before pruning and use it as a reference to maintain balance.
Post-Pruning Recovery Strategy: The first week after pruning is critical for recovery. I've learned that moving the plant to bright, indirect light is essential—direct sunlight can scorch the tender new growth. Water deeply but allow the top inch of soil to dry out before watering again. This balance prevents stress from overwatering while keeping roots hydrated. You'll know you're on the right track when you see fresh, vibrant leaves emerging from the nodes within 3-6 weeks—this is your plant's way of saying "thank you" for the pruning.
Pro Tips for Pruning Abutilon Plants
- Here's what I've learned after reviving multiple overgrown abutilons—these tricks make all the difference between a sad, leggy plant and a bushy, blooming beauty.
- Timing is Everything: Late winter or early spring is ideal because your abutilon is just waking up from dormancy.
- Precision Cuts Prevent Disaster: In Step 2, when making those 45-degree angle cuts about ¼ inch above leaf nodes, I can't stress enough how important it is to use sharp, sterilized tools.
Frequently asked questions
Got questions about pruning your Abutilon plants? You’re not alone! Here are answers to the most common concerns—whether you're a pruning pro or just starting out.
When is the best time to prune my Abutilon?
Prune your Abutilon in early spring (just as new growth begins) or after flowering in late summer. Avoid heavy pruning in fall or winter, as the plant needs energy to recover before dormancy. A light trim to shape or remove dead blooms can happen year-round!
How much can I cut back my Abutilon?
You can prune up to 1/3 of the plant’s height without stressing it. For bushier growth, cut back leggy stems to just above a leaf node (where leaves grow). Over-pruning in one go may shock the plant, so space out heavy cuts if needed. Think of it like giving your plant a haircut—gradual is best!
What if my Abutilon doesn’t bloom after pruning?
If your plant skips blooms, it might need more light (6+ hours of sunlight daily) or balanced fertilizer (high in phosphorus). Prune again in early spring, but avoid cutting back too aggressively—Abutilons bloom on new growth, so patience pays off! Yellow leaves? Check for overwatering or root-bound pots.
Can I propagate my Abutilon cuttings?
Yes!
Take 4–6 inch cuttings from healthy stems, remove lower leaves, and dip in rooting hormone. Plant in moist potting mix and cover with a plastic bag to retain humidity. Keep in bright, indirect light until roots form (4–6 weeks). It’s a great way to multiply your blooms for free!
What if I prune at the wrong time?
Pruning too late in fall or winter can delay spring growth, but don’t panic! A light shape-up is fine anytime. If you’ve already overdone it, reduce stress by watering well, keeping it in bright light, and fertilizing lightly. Your Abutilon is resilient—just give it time to bounce back!
Still unsure? Drop your question in the comments—we’re happy to help your Abutilon thrive!
Wrapping up and next steps
Pruning your abutilon plants is a simple yet powerful way to unlock their full potential—promoting lush foliage, vibrant blooms, and a healthier growth habit. 🌿 With the right tools, timing, and technique, you’ll transform those leggy stems into a thriving, bushier shrub that steals the show in your garden.
Now that you’re armed with expert tips, grab those shears and get pruning!
Ready for even more blooms? Experiment with fertilizing or try propagation from your pruned cuttings—your abutilon’s next chapter starts with you! 🌸